So you want to make your own game but haven't even done so much as look at a computer before? Hey - no skills, no problem! From the friendly folks at Click Team comes a fun household tool so simplistic, even grade schoolers could use it (and do.) Welcome to the Wonderful World of "Klik 'n Play" where the possibilities are only limited by your imagination... and the program itself.
Okay, okay - so most people scream at the thought of playing anything on this engine. "Klik 'n Play" itself was designed to be an arcade game developer, and by arcade, we're talking Pac-man. Or Donkey Kong. Or Pong. Honestly, it's difficult to make even a simple side-scrolling game with this tool without a lot of experience. The original program tutorial (which I recommend you read before you go through this) goes through the required fundamentals for making arcade games, but if you want to make anything decent, you need to figure out how to make the shortcomings work for you. So I'll be covering some tips 'n tricks on how to make your own adventure game using this program.
PLEASE NOTE: This is for Klik 'n Play - not the Games Factory, which is a later and more advanced version which you'd have to buy in order to make a proper game.
BUT FIRST: Are you sure you want to use "Klik 'n Play?" Before jumping into the game, explore your options. Maybe this isn't something you want to use? Maybe you actually might want to take the time to learn some scripting? Let us examine the pros and cons before we begin.
CONS:
PROS:
I'm going to assume you've read the KNP tutorial featured at both the website and included with the original download package. This guide isn't here to show you how to use KNP, it's here to show you how its limited abilities can be applied to adventure games.
Step 1: The Template
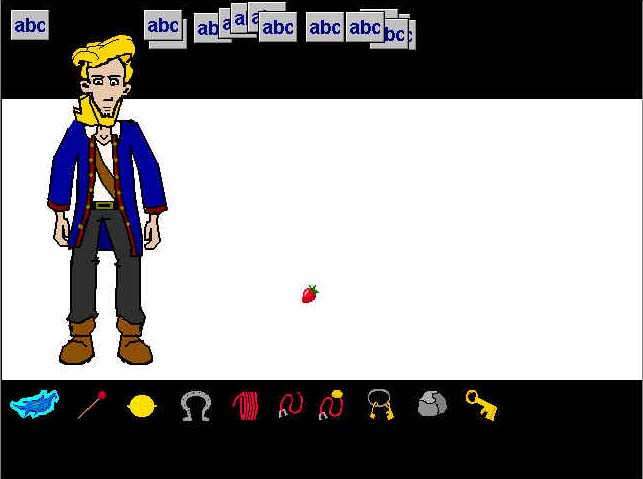 There's two kinds of scenes you'll always be working with: interactive scenes and cut-scenes. Cut-scenes are fun to do, since all the programming involves is timing and placement of characters and objects. Interactive scenes will involve more planning. And this requires a template. A template will be the scene you don't make changes to, but it contains all information that can accessed in any scene (inventory and corresponding text messages for example.) It also contains all the main programming so that you don't have to repeat it for every scene. Here is a template I used for M:I-2. In it, we have a Guybrush model, and along the bottom of the screen are all the possible inventory items. In the event editor, every possible interaction Guybrush can have with both the items and himself is already programmed in, including head animations, text messages, item selection, and walk information. The only information not included is the customized information for different locations and characters. The information from this scene can be copied into every other interactive scene. But the most important part to deal with first is the variable information.
Step 2: "Fun" with Variables
You'll learn to hate variables, but still love them. Variables are what I call the information that keeps track of your game progress and item availability. In the game however, they come in the form of "Scores," which can be found in the same menu as graphics and animations. What makes them great, is that you can assign a value to a Score, and that value can be carried on to the next scene.
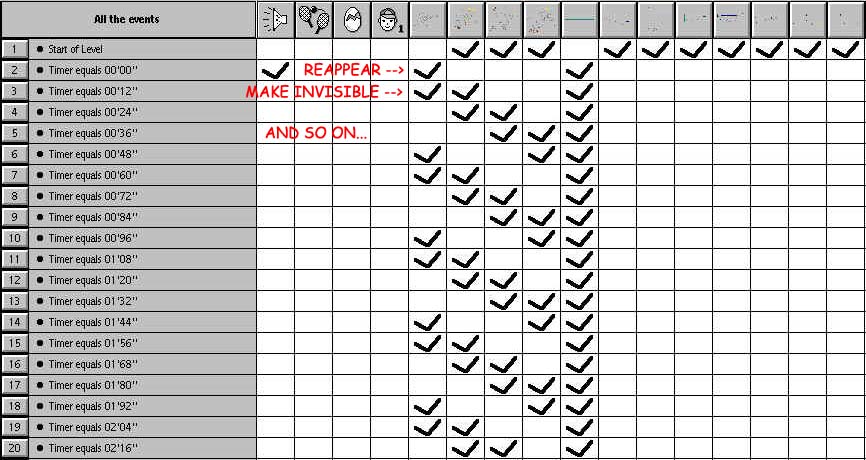
 But why would you want to do that? Well, in order for your inventory system to work properly, all items must be on-screen at all times. This is how your game will know if you've already picked up an item or used it. But, what if, for example, your character hasn't picked up the key to unlock the door yet? Simple - create a "Start of Level" action that tells all the items to become invisible, and make them visible when a Score reaches a certain value.
FOR EXAMPLE:
But that's just the basics of variables. At most, the game can only handle four scores at once (unless you include LIVES, which also works well.) You will need to design your puzzles very delicately and plan values far in advance before tending to programming them. And all of these values must be programmed into the main template before you can even begin your game, really. I recommend practicing before starting any big projects, and get a feel for it first unless you really know what you're doing.
HELP! MY EVENT EDITOR WON'T LOAD MORE THAN ONE SCORE! That's trouble. With only one score and one set of lives to keep track, your game is going to be very short. I recommend you find a KNP file that already has all four scores in a level, and then copy that level into your own file. Then delete everything except those scores so that you have a clean slate. Open a .gam file from M:I-2 and take your pick.
Step 3: My Inventory and Me
So you want to take two objects and merge them together? For every object, create a secondary looping "User Animation." And make it so that when you click that object, the program changes it's animation to "User Animation" and keeps playing it. And then you can mix actions so that when you click on an object or zone while "User Animation" is playing at the same time, you can get some kind of result. For this to work best though, you will have to make sure that the animation returns to "Stopped" every time you click somewhere significant, or you'll end up with a highlighted object throughout the game.
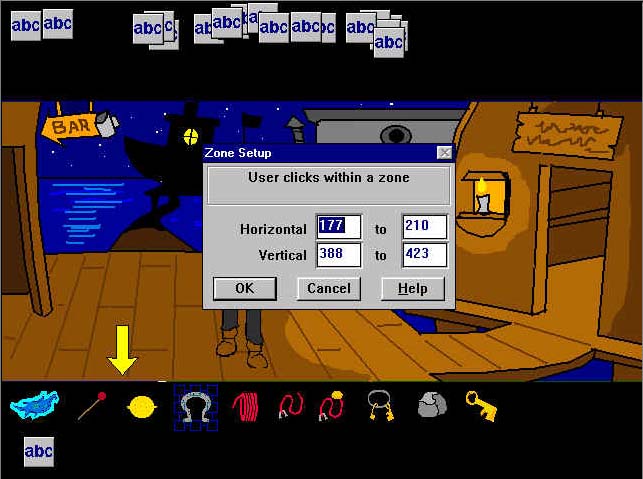 If you want to mix objects, however, it's a different story. Assuming you've already set your object to reload every time another is selected, writing an event like "User clicks on Poodle, while Poodle Paddle "User Animation" is playing" will not work simply because clicking the "Poodle" animation will stop the User Animation. So instead, use Zones. "User clicks in x,y (x,y being the coordinates surrounding the Poodle,) while Poodle Paddle "User Animation" is playing.
Step 4: Text
All the dialogue and messages in this game will have to be derived from those little text boxes you can create. Most of it is pretty straight-forward through: Create a text box when object is clicked (or something like that.) But there are certain things about the text in this game you need to know.
There is no timer option for the text messages. You cannot tell a message to disappear after five seconds of being displayed, unfortunately. Text messages can only disappear on timed events or actions. They pose no problems in cut-scenes, where you can tell a message to be created one second into the scene, and then erased 5 seconds in the scene, but if you want to have an interactive conversation with a character, things get tricky.
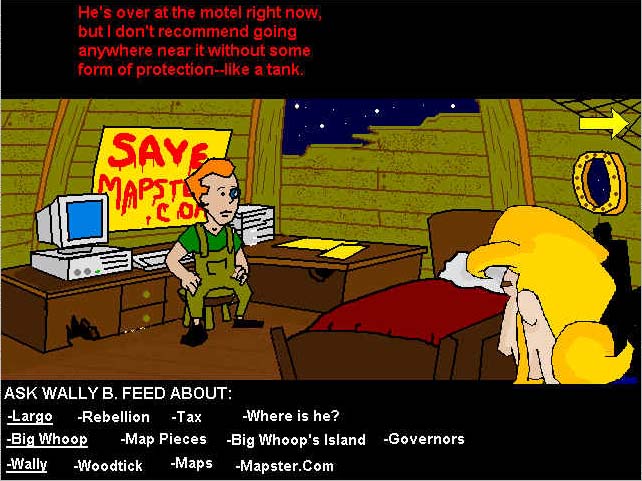 There are two ways I've figured out on how to have interactive conversations. One is using question boxes, but these require constant re-programming since they are often glitchy. By talking to a character, you can have a question box pop up with two optional questions (and I say two because these work on True/False values. There's no third party.) Select one, and the values will determine the character's response and possibly trigger another box. Unfortunately, there can be no animation during these sequences since question boxes will pause the game. The other way to have a conversation is to devote an entire scene to it, such as when Guybrush is talking to Wally. Every time you select a topic, it will release a response, and possibly open up new topics. And you can select text by using the "user clicks in zone" events.
As for active text - KNP does not have it. If you want moving text, you'll have to create it in another program as an image, and import it as an active object.
Some tips for using text: make sure you avoid placing colored text against any multi-colored background. Sometimes the colors clash and you can't read anything. I prefer to play it safe and always have the text play against a black background. Also - don't use the Flash Text option for conversations (unless later versions have a better method.) Each thread of conversation will take the same amount of time to play and it will get on the player's nerves. And when it comes to cut-scenes, it's often more fun to create a text box, play it, read it out, and then display the next one - just to get the timing right.
Finally, destroying text messages is going to be one of the biggest jobs in the game. You can't have messages playing over each other, so it's your responsibility to make sure that every event that triggers a new message ERASES every other possible message. This can be a tedious process, because a scene could possibly have about twenty messages and twenty possible actions - meaning you have to program the "erase" message close to 400 times for every message and action combination. This is why it's a good idea to create a template that has already done this for most of your inventory items.
One final message about text messages: PROOF-READ. This is the single most important (and often overlooked) process in game making. Nothing ruins a game more than bad spelling and grammar. It's difficult to take a story seriously when the main character can't even capitalize his own name - and it's even harder for us to laugh at jokes when you misspell the punch-line. So learn your language - you speak it everyday. If you're translating a game into another language, find somebody fluent who can do it for you if you're a beginner. Please spare your fellow gamers the headache and put in a little extra effort. Happy punctuating!
Step 5: Locomotion
Mode of travel is important in gaming and KNP isn't the best for this method mostly because of the glitches involved with sprites getting glued to the cursor and falling off the stage area. While most of this can be easily fixed with an "R" key (Refresh, Repair, Reload, Re-Whatever-It-Takes) most players don't find a heapload of confidence in a game that requires you to run a debugger every time Guybrush gets his head stuck in a tree. The keyboard control is sloppy, and the mouse-control is worse. The most fool-proof method of travel I've uncovered is the "Phantasmagoria" method which involves not moving the character around a play area, but simply leaving them standing and exiting the play area when asked. But I'll tell you how to do it the other way anyway if you really need it.
You can program your character to follow an eight-direction keyboard control, allowing you to move freely through a virtual space. The drawback to this, however, is that you need to place invisible objects around the play area as barriers, and this can take up a little memory since the barriers have to be relatively large so that your character doesn't walk/glitch through them. The same works with race car movement too - your travel area is designed by the barriers you place around the character. Platform control works too, except that you are given the ablity to climb and jump, but not move freely around the area unless the entire walk area is programmed to be a ladder, the bottom object on the screen is programmed to be a floor, and there are two invisible barriers on the sides to keep your character from falling out of game play.
Mouse-driven movement is very glitchy, but if you want to do it, here's how. First, create a character and attach a bounce movement to them. Now create a symbol (like a strawberry or any kind of graphic) that must be invisible every time it is introduced into play. Now create an event in which the "user clicks in zone," (the zone being the walk area) and in doing so, create a symbol at x, y. This is correct - instead of entering exact coordinates, enter x and y. KNP will see this as being told to create the symbol at the exact coordinates of the mouse. Now as the user clicks in that area, tell the character to face the direction of that symbol and start moving. The character will now move towards the symbol. Program the event editor so that when the character touches the symbol, the movement is stopped, and the symbol is destroyed. The problem with this method though, is that the hot spots on both the character and the symbol must be aligned during gameplay, so it's not uncommon to have a character not head directly towards the target destination - but instead bounce around the place.
My favorite method for travel is simply to leave the character with a stopped bounce movement and do their thing. When it's time to go, just click a little arrow that tells them to face in a confirmed direction and start walking - and when they reach their destination, they can go on to the next scene. No bouncing involved.
I don't recommend using the trail movement because most computers are too fast for it, and this can result in your character shooting all over the place like the roadrunner on crack.
Step 6: Animation
KNP's major issue at last, is how it was designed for slower computers that didn't see XP coming. In most cases, one would have to slow down their hardware acceleration in order to make the animations (let alone the game) work. But there are ways to make some of your animations pass for believable.
ANIMATION ON INTERACTIVE SCREENS: These are animations that play in a non-time based enviroment (during gameplay.) These usually include walk cycles, talking cycles, and maybe personal gestures or flashing lights. Since faster computers make them fly, it's better to design these animations simply to match your computer's speed and work with 2-4 frames per cycle. For talk cycles, I don't like to have the head on an infinite loop while he's talking. If you create a few talk frames and simply tell it to loop a few times before the original animation is restored, you'll create the illusion that the character has finished talking. And walk cycles - a couple frames will work. Just make it so that it speeds up really fast, you can still clearly see he's walking (legs in, legs out - that's all you need.) Be sure to create animations like these for each direction too.
HOW TO MAKE AN OBJECT PASS THROUGH A SCENE AT A REGULAR SPEED: This is a trick I figured out which can be used to make floating clouds in the background, and can be mixed with other events to do other kinds of effects too, like having a background slide into view. In the event editor, tell the object to re-position itself a certain number of pixels away from itself every 0.something seconds (depending on how fast or slow you want the object to move.) This kind of animation has no problem running on faster computers because you just programmed it to run in real-time.
 MAKING FRAME-BY-FRAME ANIMATION FOR CUT-SCENES: You know that Animation tool in the main menu? Never use that for these animations. If you want everything timed right, do it this way. First, draw all the animation frames you'll need. Incorporate them individually into KNP - each as a different object. Now use the event editor (and here's the tricky part,) tell the computer that when it reaches a certain frame, Object 1 (which is the first animation frame) should be made visible or positioned in the game screen. And then create an event that takes place at a later time telling it to display Object 2 (the second frame) and so on. For most of my animations, I would time the display of each frame 0.12 seconds away from each other so the first event would maybe take place at 1.12, the second at 1.24, third at 1.36 and so on until the animation is complete. This is how shots like "Neon-imation," "Demon Pirate," and "Spider-Guy" were created. If you want the animation to run slower, space the frames apart with more time, and if you want them to run faster, add less time.
HOW TO CREATE A WALKING CHARACTER WITH AN ANIMATED HEAD: This is really handy when you want to add some interest to your character. The way I do it is to create the head and body seperately, and create the hotspot of the head directly at the base of the neck, and the action spot of the body at the top of the collar. Now create an event that tells KNP to position the head at the (0, 0) coordinates of the body's action spot every 0.01 seconds. That way, you can pose the character better during gameplay, turn their heads accordingly without having to draw a whole new body, and even have their mouths moving while they walk. You may to re-position the hot and action spots for every frame though.
Most of this covers a wide range of possible applications for your game. When you get experienced enough, you can use it to manage more advanced ideas like non-linear gaming. It's all up to your imagination though - everything in the program has more than one use and whenever you find yourself in a corner, seek out possible solutions in unlikely places. One of the best way to further study KNP is to download other people's games and study their .gam files. There are many good ideas hidden away in most peoples' event editors that you never even thought of. That's how I did it.
That's all I can think of when it comes to tricks with KNP. Everything else is right there in the manual or requires a little extra thinking on your part. But, hey, we're the ones struggling with an amateur gaming engine developed for grade schoolers. Extra thinking is our middle name. Good night, everyone. Don't forget to spay and neuter Bob Barker.
![]()
![]()